
还不懂spring IOC核心原理?200行代码带你手撸一个
时间:2021-11-09 13:56:35
[导读]Spring做为Java企业级应用的开源开发框架,早已成为Java后端开发事实上的行业标准,无数的公司选择Spring作为基础的开发框架。使用Spring框架的人一定都听过Spring的IoC(控制反转)、DI(依赖注入)这两个概念,对于初学Spring的人来说,总觉得IoC、D...
Spring做为Java企业级应用的开源开发框架,早已成为Java后端开发事实上的行业标准,无数的公司选择Spring作为基础的开发框架。
使用Spring框架的人一定都听过Spring的IoC(控制反转) 、DI(依赖注入)这两个概念,对于初学Spring的人来说,总觉得IoC 、DI这两个概念是模糊不清的;对于耳熟能详的spring容器又感到模糊抽象,理解不深。本文笔者就用数百行代码模拟一个简易的spring容器和spring mvc框架,揭秘spring底层运作的核心逻辑。
spring web项目启动的时候,会在实现tomcat的listener、filter、servlet的类中完成spring容器相关的初始化工作。
于是我们也一样,先创建一个web项目。项目目录结构如图1所示:
 图1 项目目录结构图
开发spring web项目时,我们需要在web.xml中写一堆配置,为了与spring web项目一直,我们维持一样的写法,下面是项目的web.xml源码。
接下来,我们就要开始写代码了。首先我们定义几个spring最常用的注解。
定义一个MyDispatcherServlet继承自HttpServlet,模拟spring中的DispatcherServlet,接着在MyDispatcherServlet的init方法中初始化所有的工作。
init初始化方法中,主要做了这几件事:
其实所谓的容器就是一个map,key为bean名字value为实例的map。
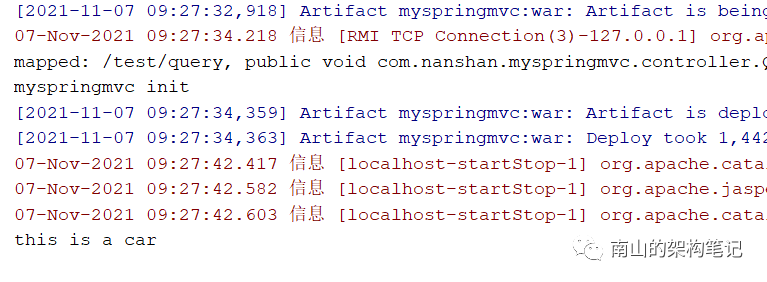
启动tomcat的过程中,有如下打印日志,说明完成了初始化。

我们在浏览器中请求:http://localhost:8080/myspringmvc_war/test/query?name=1234
看到有如下输出,说明我们的建议spring IOC容器和spring mvc框架生效了。
总结:
本文只是用一个简单的demo讲解spring IOC和spring mvc的核心原理,能让它跑起来,许多细节没有处理,不过也不是本文重点。spring框架远比这个demo复杂很多很多,想要更深入的了解spring框架的更多细节,还需要精读它的源码。
使用Spring框架的人一定都听过Spring的IoC(控制反转) 、DI(依赖注入)这两个概念,对于初学Spring的人来说,总觉得IoC 、DI这两个概念是模糊不清的;对于耳熟能详的spring容器又感到模糊抽象,理解不深。本文笔者就用数百行代码模拟一个简易的spring容器和spring mvc框架,揭秘spring底层运作的核心逻辑。
spring web项目启动的时候,会在实现tomcat的listener、filter、servlet的类中完成spring容器相关的初始化工作。
于是我们也一样,先创建一个web项目。项目目录结构如图1所示:
图1 项目目录结构图开发spring web项目时,我们需要在web.xml中写一堆配置,为了与spring web项目一直,我们维持一样的写法,下面是项目的web.xml源码。
xmlns="http://java.sun.com/xml/ns/javaee" xmlns:xsi="http://www.w3.org/2001/XMLSchema-instance" xsi:schemaLocation="http://java.sun.com/xml/ns/javaee http://java.sun.com/xml/ns/javaee/web-app_2_5.xsd">
myspringmvc com.nanshan.myspringmvc.MyDispatcherServlet contextConfigLocation application.properties 1
myspringmvc /* 接下来,我们就要开始写代码了。首先我们定义几个spring最常用的注解。
- @MyService对应spring的@Service;
- @MyAutowired对应spring的@Autowired;
- @MyController对应spring的@Controller;
- @MyRequestMapping对应spring的@RequestMapping;
@Retention(RetentionPolicy.RUNTIME)@Target(ElementType.TYPE)public @interface MyService { String value()default "";}@Retention(RetentionPolicy.RUNTIME)@Target(ElementType.FIELD)public @interface MyAutowired { String value()default "";}@Retention(RetentionPolicy.RUNTIME)@Target(ElementType.TYPE)public @interface MyController { String value() default "";}@Retention(RetentionPolicy.RUNTIME)@Target({ElementType.METHOD, ElementType.TYPE})public @interface MyRequestMapping { String value() default "";}下面就是最核心的,spring项目的启动初始化了,我们这里主要是在servlet启动的时候初始化的。定义一个MyDispatcherServlet继承自HttpServlet,模拟spring中的DispatcherServlet,接着在MyDispatcherServlet的init方法中初始化所有的工作。
init初始化方法中,主要做了这几件事:
- 加载配置文件;
- 扫描包下的类;
- 初始化IOC容器,把相关的类注入相关的实例;
- 自动注入bean;
- 初始化spring mvc的handingmapping;
@Overridepublic void init(ServletConfig config) throws ServletException { super.init(config); // 1 加载配置文件 loadConfig(config.getInitParameter("contextConfigLocation")); // 2 扫描相关的类 scanPackages((String)contextConfig.getProperty("scanPackages")); // 3 初始化IOC容器,把相关的类注入相关的实例 createInstances(); // 4 自动注入 autowiredInstance(); // 5 初始化handingMapping() initHandleMapping(); System.out.println("myspringmvc init");第一步加载配置,主要是读取application.properties中的配置,contextConfig是一个Properties对象。private void loadConfig(String contextConfigLocation) { InputStream is = this.getClass().getClassLoader().getResourceAsStream(contextConfigLocation); try { contextConfig.load(is); } catch (Exception e) { e.printStackTrace(); } finally { try { if (is != null) { is.close(); } } catch (IOException e) { e.printStackTrace(); } }}第二步,扫描scanPackages配置路径下的类,找到添加了@MyService,@MyController注解的类。private void scanPackages(String scanPackages) { URL url = this.getClass().getClassLoader().getResource("/" scanPackages.replaceAll("\\.", "/")); File classPath = new File(url.getFile()); for (File file : classPath.listFiles()) { if (file.isDirectory()) { scanPackages(scanPackages "." file.getName()); } else { if (!file.getName().endsWith(".class")) { continue; } String className = scanPackages "." file.getName().replaceAll(".class", ""); classNames.add(className); } }}第三步,初始化IOC容器,把相关的类注入相关的实例,也就是把第二步扫描出来的类实例化,放到容器中。其实所谓的容器就是一个map,key为bean名字value为实例的map。
private void createInstances() { if (classNames.isEmpty()) { return; } try { for (String className : classNames) { Class clazz = Class.forName(className); if (clazz.isAnnotationPresent(MyController.class)) { String beanName = toLowerFirstCase(clazz.getSimpleName()); Object instance = clazz.newInstance(); ioc.put(beanName, instance); } else if (clazz.isAnnotationPresent(MyService.class)) { String beanName = toLowerFirstCase(clazz.getSimpleName()); MyService service = clazz.getAnnotation(MyService.class); if (!"".equals(service.value().trim())) { beanName = service.value(); } Object instance = clazz.newInstance(); ioc.put(beanName, instance); } else { continue; } } } catch (Exception e) { e.printStackTrace(); }}第四步,把实例化完的实例,注入到bean中。其实也很简单,就是根据bean的名字,到IOC容器(map)中找到对应的实例,set到bean中就可以了。private void autowiredInstance() { if (ioc.isEmpty()) { return; } for (Map.Entry entry : ioc.entrySet()) { Field[] fields = entry.getValue().getClass().getDeclaredFields(); for (Field field : fields) { if (!field.isAnnotationPresent(MyAutowired.class)) { continue; } MyAutowired autowired = field.getAnnotation(MyAutowired.class); String beanNmae = autowired.value(); if ("".equals(beanNmae)) { beanNmae = field.getName(); } field.setAccessible(true); try { field.set(entry.getValue(), ioc.get(beanNmae)); } catch (Exception e) { e.printStackTrace(); } } }}第五步,完成spring mvc容器相关的工作。我们这里主要是给@MyController注解的类中的@MyRequestMapping找到对应的url对应的处理method。private void initHandleMapping() { if (ioc.isEmpty()) { return; } for (Map.Entry entry : ioc.entrySet()) { Class clazz = entry.getValue().getClass(); if (!clazz.isAnnotationPresent(MyController.class)) { continue; } String bastUrl = ""; if (clazz.isAnnotationPresent(MyRequestMapping.class)) { MyRequestMapping requestMapping = clazz.getAnnotation(MyRequestMapping.class); bastUrl = requestMapping.value(); } Method[] methods = clazz.getMethods(); for (Method method : methods) { if (!method.isAnnotationPresent(MyRequestMapping.class)) { continue; } MyRequestMapping myRequestMapping = method.getAnnotation(MyRequestMapping.class); String url = ("/" bastUrl "/" myRequestMapping.value()).replaceAll("/ ", "/"); handingMapping.put(url, method); System.out.println("mapped: " url ", " method); } }}完成了IOC和spring mvc的初始化工作后,spring最核心的工作就做完了。接下来,我们就可以写一个service和controller测试下。@MyRequestMapping("/test")@MyControllerpublic class QueryController { @MyAutowired private Car car;
@MyRequestMapping("/query") public void query(HttpServletRequest request, HttpServletResponse respones, String name) { car.print(); }}@MyServicepublic class Car { public void print() { System.out.println("this is a car"); }}最后,在tomcat中启动程序,请求controller中的地址,测试下程序是否正常运行。启动tomcat的过程中,有如下打印日志,说明完成了初始化。
我们在浏览器中请求:http://localhost:8080/myspringmvc_war/test/query?name=1234
看到有如下输出,说明我们的建议spring IOC容器和spring mvc框架生效了。
总结:
本文只是用一个简单的demo讲解spring IOC和spring mvc的核心原理,能让它跑起来,许多细节没有处理,不过也不是本文重点。spring框架远比这个demo复杂很多很多,想要更深入的了解spring框架的更多细节,还需要精读它的源码。


